6 SyncGene Tips to Increase Productivity
A task you might think is simple could end up becoming really complex. We at SyncGene know this all too well, which is why our team is constantly working on new updates and nifty features to make your employees’ remote work easier. While a few of the latest SyncGene features can massively change your synchronization experience, some of you might not know they exist at all. Tips, tricks, even hacks are hiding around every corner! We put together this article to help you maximize your SyncGene experience, and we left no stone unturned.
A task you might think is simple could end up becoming really complex. We at SyncGene know this all too well, which is why our team is constantly working on new updates and nifty features to make your employees’ remote work easier.
While a few of the latest SyncGene features can massively change your synchronization experience, some of you might not know they exist at all. Tips, tricks, even hacks are hiding around every corner!
We put together this article to help you maximize your SyncGene experience, and we left no stone unturned.
Table of Contents:
#1 – Use folder mapping
You may know that folder mapping is a brand new SyncGene feature. We consider it the most anticipated update of 2020, perfect for people storing long lists of data on their devices.
With mapping folders, users can choose which folders or groups from their Calendars, Contacts, or Tasks that they want to synchronize and where they are synced to.
Here’s an example of how you can use it.
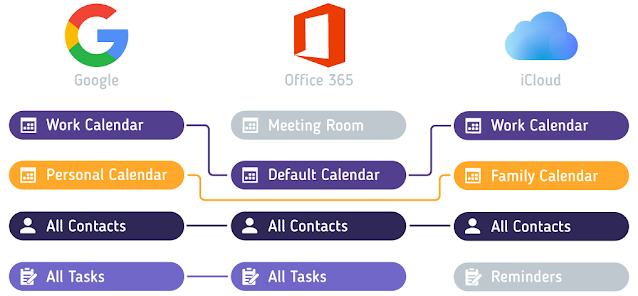
Say you have an iPad that your family is using at home. You set up synchronization between the iPad and an Android phone that you use for work. You are now synchronizing your work events with the iPad, so your family knows when you’re free for lunch.
After some time, you realize that your spouse had the same idea! He/she created their own SyncGene account and connected their work phone with the family’s iPad.
So, when you open the Calendar app on the iPad, you see that all events are mixed up in no particular order. Now, with no distinction between Calendars, it’s hard to understand which events belong to which family member .
Next thing you know, your kids don’t understand your availability anymore. Then, calls in the middle of important meeting s start. The whole idea of a shared Calendar is ruined!
Folder mapping helps users to store Calendars from multiple sources on one device, keeping your family’s agenda organized.
In this situation, you and your spouse will choose which folders will sync with the iPad. Not only that – you can also create new folders on your iPad to separate work and family events. Your iPad Calendar will be organized once again!
Let’s see how folder mapping works on SyncGene.
Step 1. Log in to your SyncGene account and make sure you have at least two sources added.
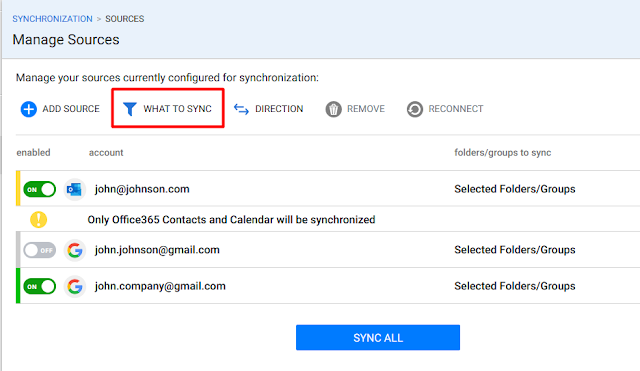
Step 2. To choose folders or groups for synchronization, go to “What to Sync”.
Step 3. Click “Add calendar”, “Add contacts folder/group”, or “Add tasks folder/list” to create new pairs for synchronization.
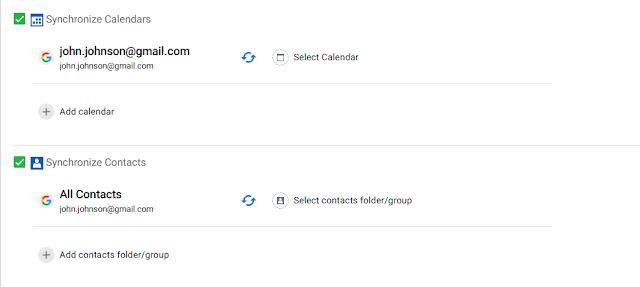
Step 4. Choose which folders /groups you want to select from each source.

If you want to sync events from the default calendar folder, choose your email address.
You can create as many synchronization pairs as you want so long as the folders and groups are on different sources. Data will be synchronized within the folder pair only.
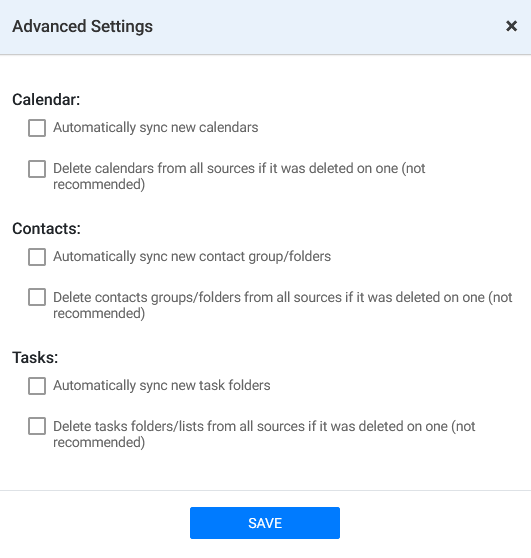
Step 5. Choose advanced settings to create a more tailored synchronization:
Choose “Automatically sync new calendars/contacts/tasks ” if you want to sync new items between sources as soon as they are created.
The option to “Delete calendars/contacts/task s from all sources if it was deleted on one” enables automatic removal of deleted items on all connected sources.
And that’s it – your folders are set up and ready to be synchronized!
Scroll down to the “Manage directions” section to also know how to set up sync directions for an even more organized synchronization.
#2 – Automatic back up every 30 days
Did you know that the newest SyncGene feature was rolled out just recently? If you haven’t heard – our service now creates a back-up of your data automatically every 30 days.
That’s right – your data is being backed up automatically to your Google Drive account. This means that if the latest synchronization will not go as planned, you will have the ability to undo it. You don’t have to worry if your data is safe and protected.
Important note – currently all your backups are stored in Google Drive. iCloud and OneDrive will be supported in the upcoming versions.
If you want to back up your data automatically, you will have to enable data backup when you start your first synchronization. If you see the below message, click “Proceed with backup”.
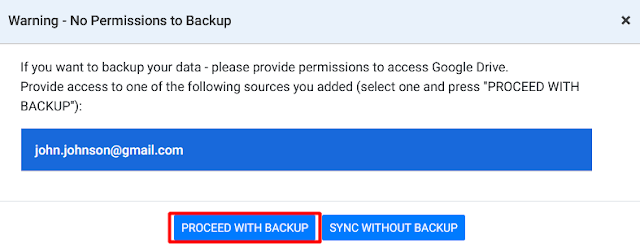
After the first synchronization, you won’t have to do anything – Contacts, Calendars, and Tasks will be backed up automatically.
If you want to get your data back to its original state, follow the steps below.
Step 1. Make sure that SyncGene has access to your Google Drive account. To be sure, go to “Sources”, click on your Google account and select “Allow access”.
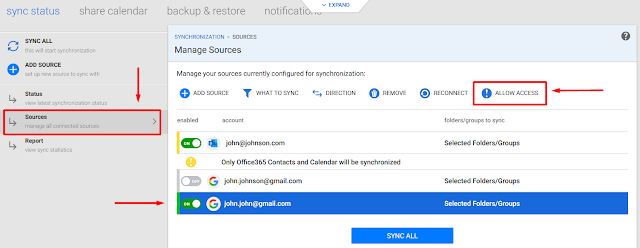
If you do not see the “Allow access” option, access was already granted.
Step 2. Go to the “Backup & Restore” page.

Step 3. Navigate between connected sources using the arrows (<>) and see backed up folders from Calendars, Contacts, or Tasks separately.

Step 4. Choose the source and data type, then select folders that you want to restore. In case one folder has multiple backups, a drop-down menu will appear showing specific dates.
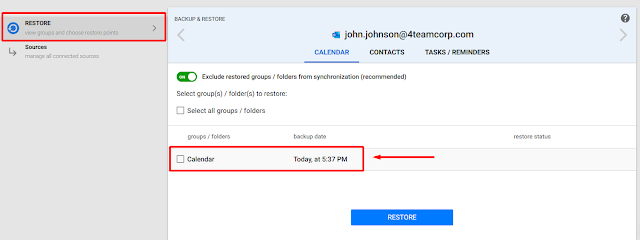
Choose the folder and click “Restore”.
Enable the option to “Exclude restored groups/folders from synchronization” to leave restored folders out from the next and all future synchronizations (unless you choose otherwise).
Don’t you feel more productive already?
#3 – Auto-sync every 30 minutes
If you are wondering what kills employee productivity the most, here’s an answer for you. Doing the same task over and over again manually will definitely do it.
SyncGene is all about remote work productivity. The service will not only check the latest changes to services applications for you – it’ll update the information automatically.
Automatic synchronization is available for all SyncGene Premium, Teams, or Enterprise users. Just enable auto-sync anytime!
To do that, you or your team members need to go to your SyncGene account and enable the “Auto Sync” option. If enabled, your data will be synchronized every 30 minutes.
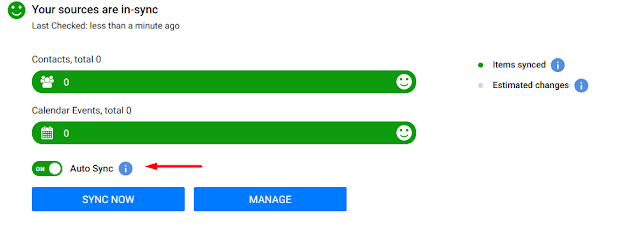
But what if you don’t want to wait those 30 minutes? Press that “Sync Now” button and all will be set for you.
You can start synchronizing from your smartphone as well. Go straight to the “Use the mobile app to increase work productivity” to see SyncGene mobile features.
#4 – Manage directions
Before any synchronization, you can choose which accounts are updated and which are not. You can do this by setting up synchronization directions.
Setting sync directions is a good way to safeguard your Calendar, Contacts, and Task data. By setting what and where to sync, you can ensure that important information will not be exposed to people that do not need to see it.
Let’s get back to the example with the shared Calendar on the iPad.
Say you want to synchronize your work Calendar with the iPad that your family uses daily. You want your family to see your availability for lunch. At the same time, you don’t want the family calendar to appear on your work phone.
After all, “Jane’s dentist appointment” could only be a distraction from your work.
That’s why setting correct synchronization directions will seriously help you to keep work and home life separated. Especially if you are quarantined and working from home.
By default, two-way synchronization is enabled for Calendar events, Contacts, and Tasks.
In case you want to change the default setting, here’s how to do it:
Step 1. Go to your SyncGene account and make sure that at least two sources are added.
Step 2. When on the source management page, find “Directions” to manage how your Calendars, Contacts, and Tasks should be updated.
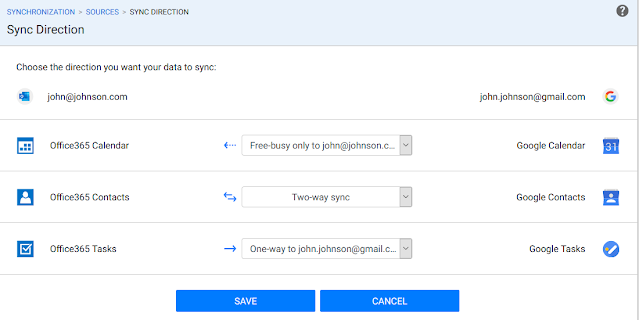
Choose two-way synchronization to update changes on all connected accounts. This option is recommended if you want to keep your Calendars, Contacts, and Tasks updated on all devices you use.

Choose one-way synchronization to make changes on one account only. For example, synchronize data from a work phone to the family iPad, and never the other way around.

For Calendars, additional sync direction can be set – “Free-Busy” to one of your sources. This option will only sync the availability information to the specified source . Event names, participants, and other information will be left out.

This is a great way to stay connected with your family while maintaining your privacy at the same time.
Step 3. Don’t forget to save your settings and start the synchronization.
Hooray! Your preferences are saved for the upcoming synchronizations. And you will never be distracted again!
#5 – Analyze results with SyncGene reporting
We are always saying that SyncGene will save your employees lots of time with its automated solutions. But did you know that you can actually track that?
Check out the reporting panel to track how many changes SyncGene has detected, when the last sync was executed, and how many synchronizations SyncGene performed overall.
Step 1. Go to your SyncGene account and choose “Report” on the right panel.
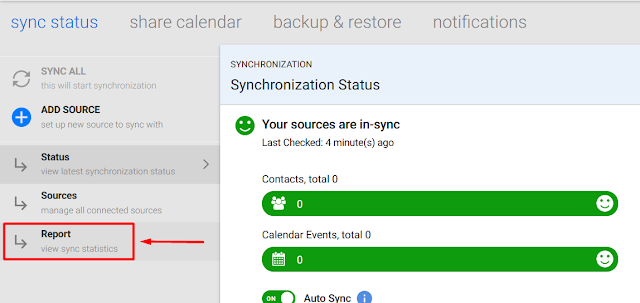
Step 2. On the “Report” page you will see all sorts of statistics. Check how many changes SyncGene has done overall across all connected sources and analyze which applications (Contacts, Events, or Tasks) were updated the most.
Adjust the data range for more precise insights.
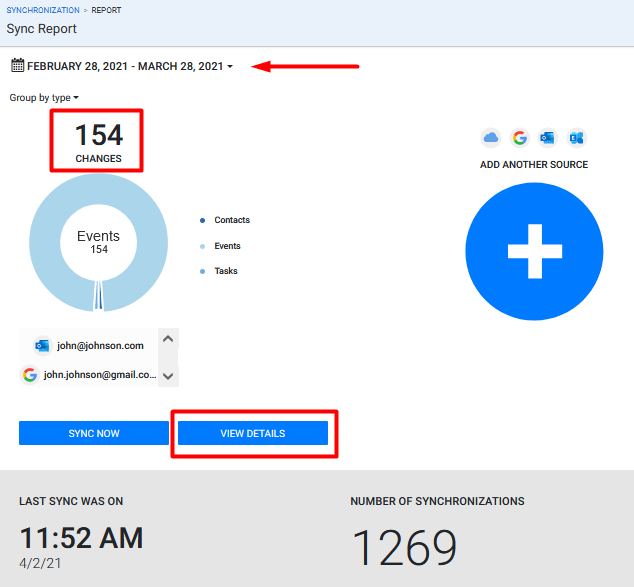
Step 3. Click the “View details” button to analyze sources in detail.

Select “Group by source” to change the view.
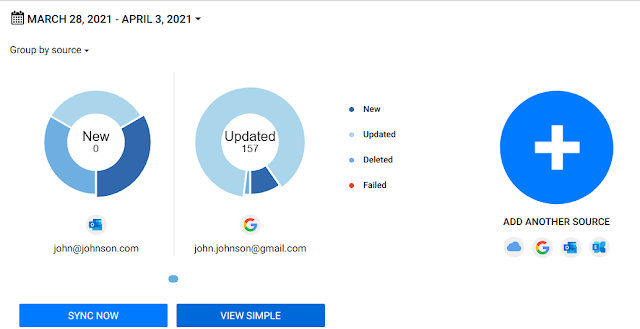
That’s how SyncGene keeps you in the loop – so you can understand your data needs better and set ways to improve work productivity.
#6 – Use the mobile app to increase work productivity
Since you probably always have your phone with you, check out SyncGene’s mobile app. It is perfect for keeping up with your important task for the day, avoiding missed deadlines.
Install SyncGene on your iOS or Android device and check your account any time of the day.
On the SyncGene app, you will find the same features as the online site.
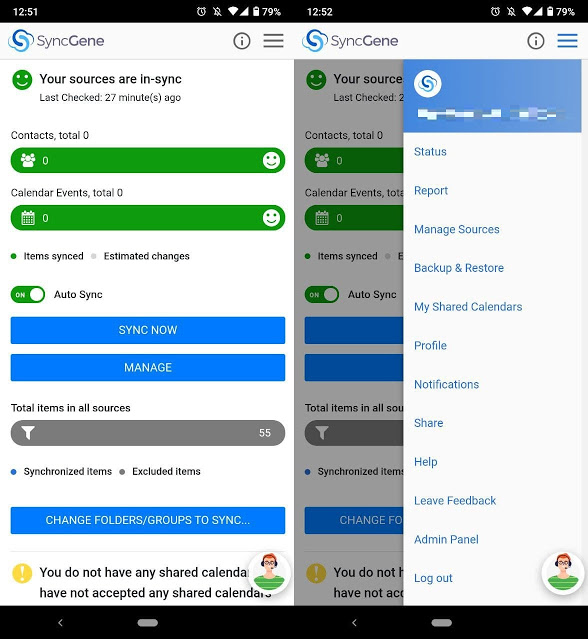
Use the menu tab to navigate between different windows – from sync status, source management, to reporting.
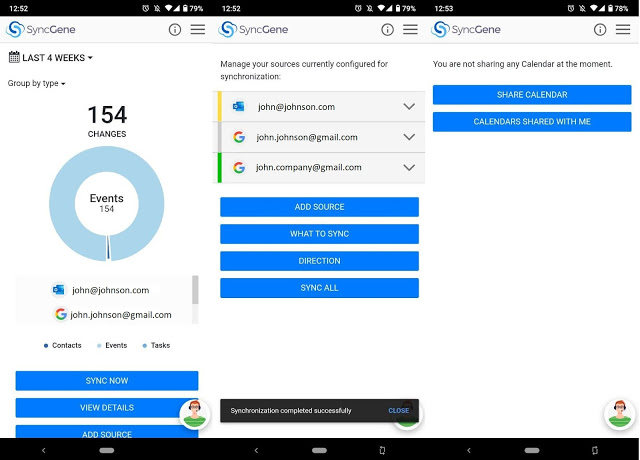
SyncGene Enterprise users have access to the Admin Panel. Administrators can add new members, add sources for each member, set up contacts sharing, and access every other feature that is available online!
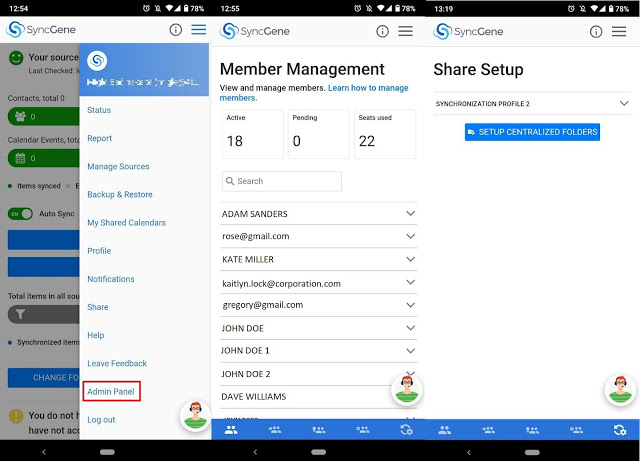
So now, if you need to make important adjustments, you do not have to be in the office or use your computer. Make your decisions on the go!
Wrapping up
That’s it – if you made it this far, consider yourself a true SyncGene pro ready to take your daily work to the next level.
If you don’t have one already, create a SyncGene account and start increasing productivity today. SyncGene will save your time and hours of work, no matter what your task for the day is. That's not just a promise, that's our personal guarantee!
While you’re at it, don’t forget to check what existing new updates will roll out in 2021.
Read more:


%20white.svg)
.svg)