Sync Google Workspace and Microsoft Outlook
We can all agree that Google Workspace is a fantastic tool for a team. So is Microsoft Outlook. Having said that, wouldn't it be wonderful if there was a method to combine two excellent things and make them even better? You read that correctly. When you can access both at once, why use them separately? To put it another way, if you've been working toward combining calendar, contacts, or tasks - SyncGene is what you’ve been searching for! This article explains ways you can sync Google Workspace and Microsoft Outlook in few simple steps.
Table of Contents:
Can you automatically sync Google Workspace and Microsoft Outlook?
If you search how to automatically sync Google Workspace and Microsoft Outlook, you’ll get these options:
- Use Google Workspace Sync for Microsoft Outlook (GWSMO).
- Try a third-party tool to automate the process.
Google Workspace Sync for Microsoft Outlook (or GSSMO) is a tool supplied by Google that lets you use Google Workspace and Outlook together. This plug-in lets you synchronize emails, calendars, contacts, notes, and tasks between Google and Microsoft Outlook.
SyncGene helps you connect Google Workspace with Outlook in minutes, saving you all the hassle of a complex data transfer scenario. It lets you easier and faster sync emails, calendars, contacts, notes, and tasks.
How GWSMO works?
Use Google Workspace Sync for Microsoft Outlook (GWSMO) to synchronize your accounts if they are associated with your work, university, or another group. The synchronized data, such as Gmail and other Google Workspace products, may then be accessed in Outlook on any device where you have a Google Account.
Now… How to set it up:
Step 1: Install and set up GWSMO
Start with installing GWSMO and signing into your Google Account. Then import your data from your Outlook profile, or from a PST file containing Outlook data exported, to your Google Account.
Step 2: Set your default profile in Outlook
Each time you start Outlook, you're prompted to choose the profile for whichever account you want to open. So set Google profile as default in Outlook, after that it will be able to open your Google Workspace profile automatically, making it easier to use GWSMO.
Step 3: Understand what gets synchronized
Step 4: Check if email, calendar events, and contacts are synced between Google Workspace and Outlook. Some other types of data aren't synchronized, such as Calendar attachments, or are formatted differently, such as Gmail.
When you stay within one system, data migration is typically simple. Users may sync Google Calendar with other Google Apps or Microsoft Outlook with Office 365. However, when it comes to Google Workspace syncing with Microsoft Outlook using GWSMO, not all issues are solved. Here is where SyncGene comes in.
Sync Google Workspace and Outlook online with SyncGene
There are more than a few companies that used SyncGene to sync their data. In this specific case, the company wanted to solve the double-booking issue. They looked for ways to resolve this but found that manually exporting and importing calendar files was laborious and resulted in more duplicates. Instead of helping to schedule events, these productivity tools were doing the complete opposite… So, they turned to SyncGene to sync data from G Suite (currently Google Workspace) and Outlook 365.
Two-way synchronization was set up between both platforms for each team member. In no time, all the employees had to do was open either platform – Google Workspace or Outlook 365 – and they could see all events in one calendar view from both platforms.
Read the whole case here: SyncGene Enterprise – Synchronization Case Study: Greens List
How SyncGene works?
Follow the steps below to learn how to sync Google Workspace and Outlook 365 with SyncGene Enterprise.
Step 1: Get started. Head to the SyncGene site. Or, if you are on the go, use SyncGene app suitable for iOS and Android.
Step 2: Click on Sign up to make a SyncGene account, or Log in, if you already have an account. Be sure to have a valid SyncGene Enterprise subscription.

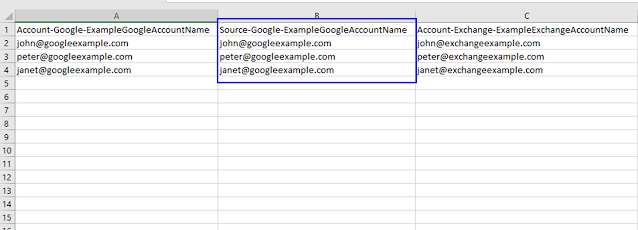
Step 3: Set up member accounts and sources. Add company employees to an Enterprise account by uploading a pre-filled CSV file. The file can include the following data:
- Login (A). This column will define how users will log in to their accounts.

- Sources (B, C). Here you will set up accounts for synchronization. Choose at least two sources.

- Filter (D, optional). Choose which folder/group you want to synchronize between the sources. Choose default calendar and contacts folders, or all folders from all sources.

- Directions (E, F, optional). Set one-way or two-way synchronization.
See the in-depth step-by-step manual on how to prepare the CSV file and define values for each setting.
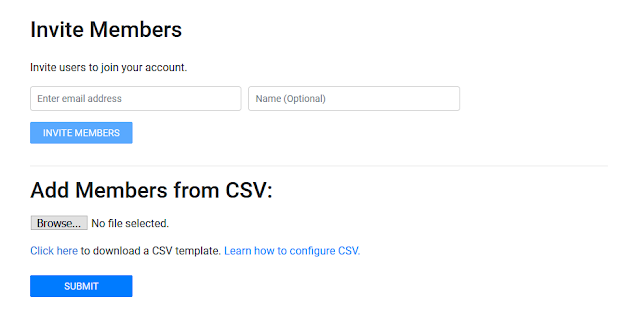
Step 4: Add users. Once you have the CSV file prepared, click on Members, then Add member to upload it.

You can also invite users to your Enterprise plan member-by-member. To do so, enter the email address into the field.

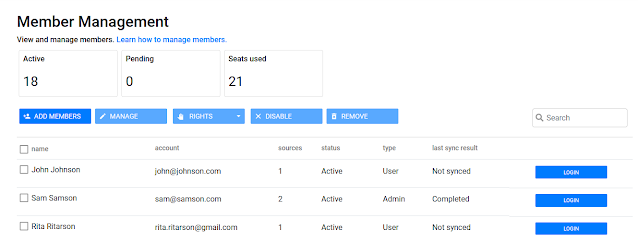
Step 5: Manage members. Via the Enterprise panel you can:
- Manage members. Change users’ names, set specific notification settings.
- Assign rights. Promote selected user to an admin or demote admin to a user. Admins can add/remove users, manage payments.
- Disable/Enable accounts. Accounts can be disabled or enabled. If an account is disabled, the user will be unable to log in and synchronize.
- Remove members. Remove the selected user from the enterprise account.

Step 6: Connect Google Workspace/G Suite with Outlook 365. Once your preferences are set up, you are ready to go! Calendars and contacts will now be moved from G Suite to Office 365 for each added account. Fantastic job!
Summing things up
There are great benefits for your business if you sync data from your Google Workspace to Outlook 365. Whether it’s fast and easy migration of data or synchronization of calendars and contacts. These are just a few sync scenarios, we have the solution for. With SyncGene you can synchronize your Cloud sources across platforms easily.
Do not wait and check out SyncGene Enterprise now! And, if you have any questions, send us an email, give us a call, or start a Live Chat.
Read more:


%20white.svg)
.svg)