
Google Calendar Sharing
Managing your time between work, family, and hobbies can be difficult. Thankfully, Google has a few useful tools to help you keep track of your schedule. In this article, we'll show you how to share calendars with those who need it.
Managing your time between work, family, and hobbies can be difficult. Thankfully, Google has a few useful tools to help you keep track of your schedule.
In this article, we'll show you how to share calendars with those who need it.
Table of Contents:
How can you share a Google Calendar with others?
When thinking about what it is like to work in the modern world, long hours and busy schedules immediately come to mind. To run smoothly, companies rely on teamwork and optimal time management.
For running a company like a well-oiled machine, sharing calendars is crucial. Such a simple solution can ensure efficiency, improve organization, and lead to smooth collaboration. Managers, realizing this, make use of shared calendars to boost and increase productivity across their workplace.
The process of calendar sharing means giving another person access to your events and to-do lists.
It’s a form of knowledge sharing. You can share events with your peers without sending invitations one-by-one. You can also share calendars with your assistant, so they know where you are in the office. You can even use calendar sharing to book conference rooms and recreation time at work, such as a coffee morning.
This solution prevents double bookings and saves you lots of time.
When it comes to sharing your Google Calendar, there are a few different ways to do it.
Next in the article, we will talk about these ways one-by-one, discussing the pros and cons for each, and providing step-by-step instructions.
If you want to know how to share Google calendars cross-platform automatically, scroll straight to the “How to share Google Calendar cross-platform automatically” section.
Share Google Calendar with other Google users
Google offers a relatively easy way to share any calendar. You can even set different access permissions for each calendar that you share.
However, Google does not allow sharing calendars with non-Gmail users. This means that if you want to share calendars with users on Office 365 or iCloud, you will not be able to do so.
Also, Google Calendar sharing with other Gmail users can only be set up online. You can’t share calendars from the Google Calendar app.
To share a calendar with specific Gmail users, follow the steps below.
Step 1. Open Google Calendar in your browser and log in to your Google account.
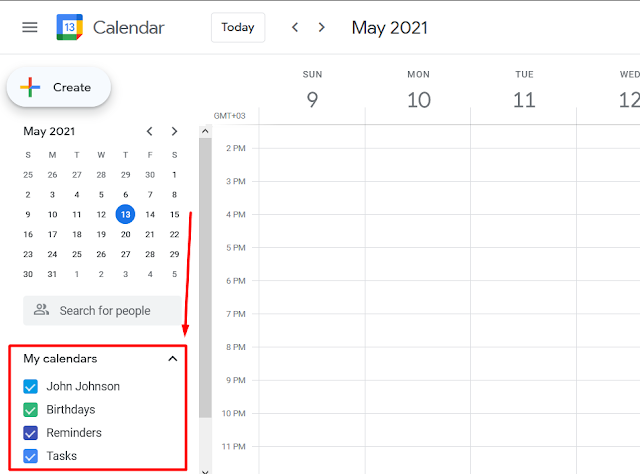
Step 2. On the left sidebar, find the “My calendars” section. To expand it, click the Down arrow.
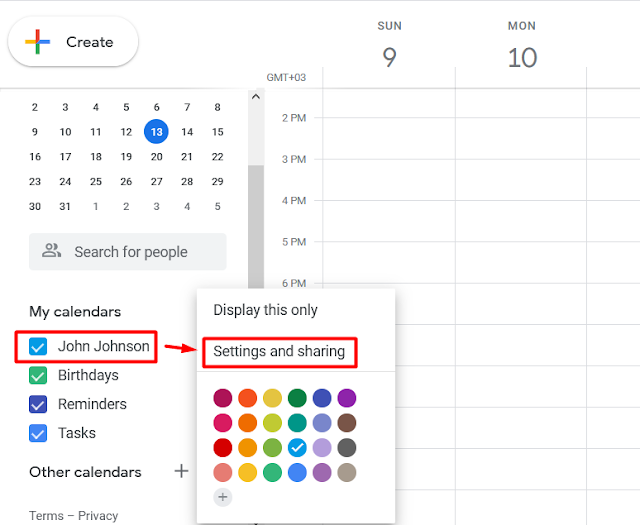
Step 3. Hover over the calendar you want to share, open calendar options, choose “Settings and sharing”.
Step 4. Find the “Share with specific people” section and click Add people.

Step 5. Enter the person’s Gmail address. Use the drop-down menu to adjust their permission settings.
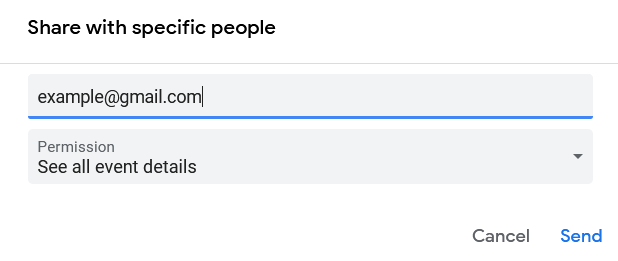
Step 6. Click Send.
Now the recipient will receive an email asking to accept the calendar. The person will need to accept the emailed link to add the calendar to their own list.
That’s it! Sharing calendars with other Gmail users on Google is really simple, though you should always have in mind a couple of substantial limitations.
To learn how to avoid these limitations and share calendars cross-platforms automatically from anywhere, scroll down to “How to share Google Calendar cross-platform automatically”.
Google Calendar sharing with the public
The only way to let non-Gmail users view your calendar in Google is to make it public.
Be cautious of choosing this option though. As soon as you make a Google calendar public, anyone can find it through Google search. When using public calendars, you can only control which details others see, but not who sees it.
It’s also the same for sharing calendars with other Gmail users, you cannot make your calendar public from the Google Calendar app.
In case you want to share your Google calendar with the public, here’s how to do it.
Step 1. Open Google Calendar in your browser and log in to your Google account.
Step 2. On the left sidebar, find the “My calendars” section. To expand it, click the Down arrow.

Step 3. Hover over the calendar you want to share, open calendar options, and choose “Settings and sharing”.

Step 4. Under “Access permissions”, enable “Make available to public”.

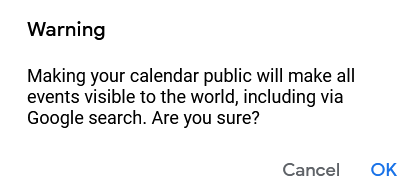
Step 5. A warning message then pops up. Click “OK” if you want to proceed.
Step 6. Next to “Make available to public”, choose the level of access you want to give in the drop-down menu.

Now you can share your calendars with whomever you want, even outside Google. Click on “Get shareable link” to get a link that you can send to your co-workers, friends, and family.
If you ever change your mind about having a public calendar, you can always disable it in the settings.
Share calendar with an Office 365 user manually
Another workaround to share calendars with non-Gmail users is to export a calendar from Google to an ICS file and send it to others. People that receive the file can upload it to their Outlook.
The main benefit of this solution is that you can pass the file over to anyone you want, no matter if they are inside or outside the organization.
This will have to be done manually though, meaning that the shared calendar will never be up-to-date in real-time.
If you want to do this process automatically, go straight to “How to share Google Calendar cross-platform automatically”. Otherwise, follow the steps below.
Stage 1 – export Google Calendar
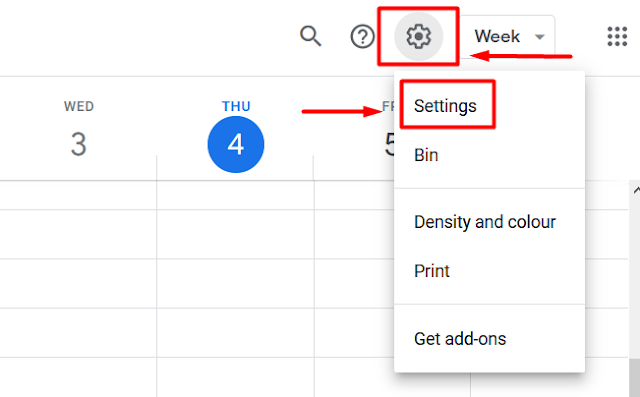
Step #1. Go to Google Calendar and log into the account that you want to export events from. Then, click on the gear icon and choose “Settings”.
Step #2. Click on the “Import & Export” button on the left panel and choose “Export” below your calendars.
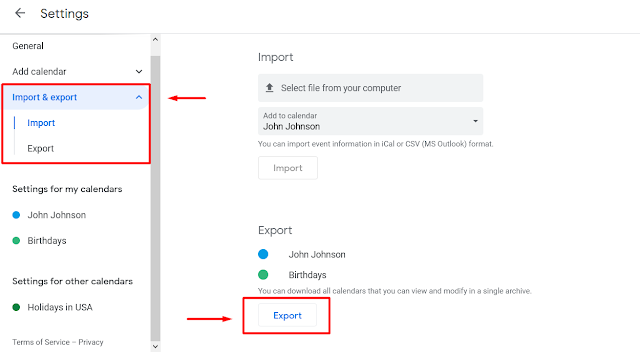
Step #3. Save the ical.zip file which will start downloading and send it to anyone you want via email or any messaging app.
That’s it! The receiver can now upload it to their Outlook account.
Stage 2 – import the calendar to Outlook
Step #1. Open the Outlook application on your computer and sign in.
Step #2. At the top of your Outlook ribbon, select File.

Step #3. Select Open & Export, then Import/Export.

Step #4. Select Import an iCalendar (.ics) or vCalendar file (.vcs), and then click Next.
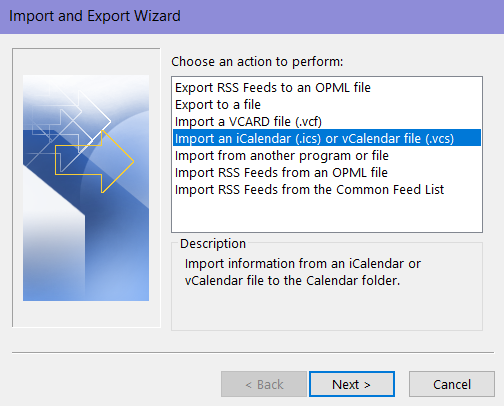
Step #5. Choose the .ics file you have previously downloaded and click OK.
Step #6. In the pop-up window choose if you want to open as a new calendar in your Outlook, or simply import the events that will be merged with your existing data.

And you’re done! Now the user will see your calendar events on their Outlook Calendar.
Keep in mind that if any new meetings appear on your Google account, they will not appear on Outlook automatically. So, you will probably need to repeat the above steps manually as soon as new events are created on your Google Calendar.
Sharing data manually is always a hassle. Luckily, there is a better solution for you!
Automatic Google Calendar sharing with SyncGene

Share Calendars with SyncGene and avoid annoying Calendar sharing limitations in Google. Don’t worry – the service does not work as another group Calendar.
SyncGene is a cross-platform web app, making Calendars from Google, iCloud, or Office 365 compatible with other cloud-based services. Bridge the gap between your Android or Apple smartphones, tablets, PCs, and smartwatches.
And the best part is that you do not have to install anything. Use the application you are most familiar with!
Want to learn more? Visit our Help Centre to see how to share Calendars with SyncGene. Or simply follow the steps below!
How to share Google Calendar cross-platform automatically
Once you have a SyncGene account, you can share your Calendar effortlessly and in a few clicks.
Stage 1 – Share Calendar
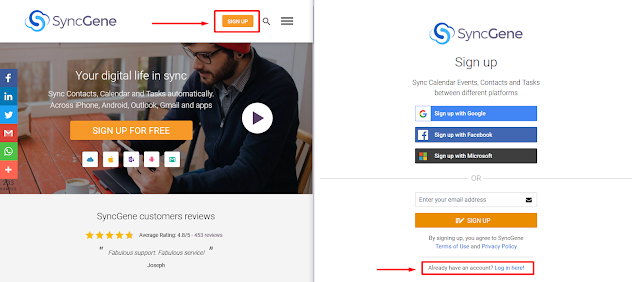
Step #1. Create a SyncGene account. Head to the SyncGene website, or if you're on the go, use the app on your iPhone or Android phone.
Step #2. Set up sources. To share Calendars, you need to set up at least one source. Click the “Sources” button to see all active accounts. Select “Add Source” and choose an account you want to include for Calendar sharing.
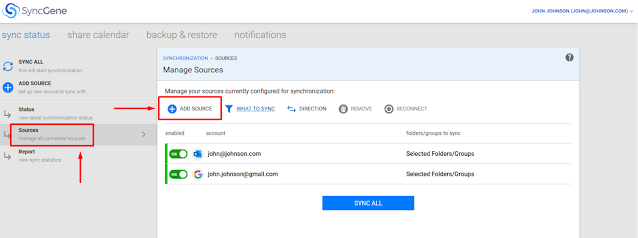
Step #3. Click “Share Calendar”.

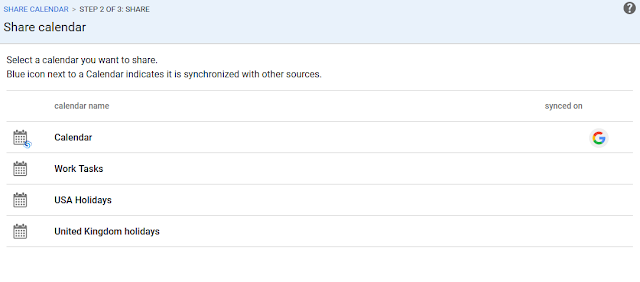
Step #4. Choose which Calendar you want to share.
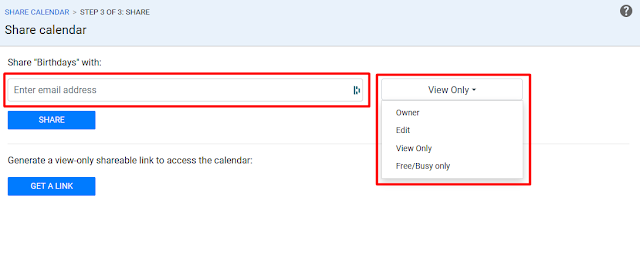
Step #5. Enter the receiver’s email address and select permissions. Set different sharing privileges for every recipient. Click “Share”.
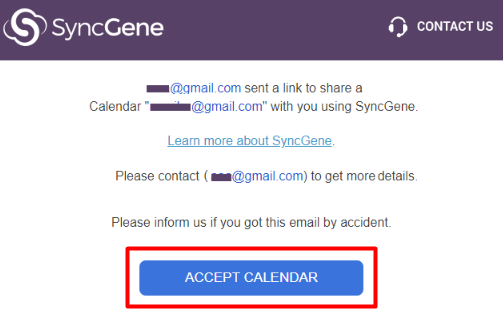
Step #6. The receiver will now get an email inviting them to view the Calendar you have shared.
And you are all set!
You can also create a shareable calendar link and send it to others via any messaging app or email. Have in mind that a shareable link gives “View only” rights to recipients. To assign “Edit” rights, you will need to invite users via your SyncGene account, following the above steps.
Stage 2 – Accepting shared Calendars
Step #1. When you receive an email invitation to view a specific Calendar, press “Accept Calendar”.
Or, if you have received a link directly, open it.
Step #2. Log into your SyncGene account, or if you do not have one, Sign Up.
Step #3. Choose where you want the Calendar to appear (Google, Outlook, or any other cloud service).
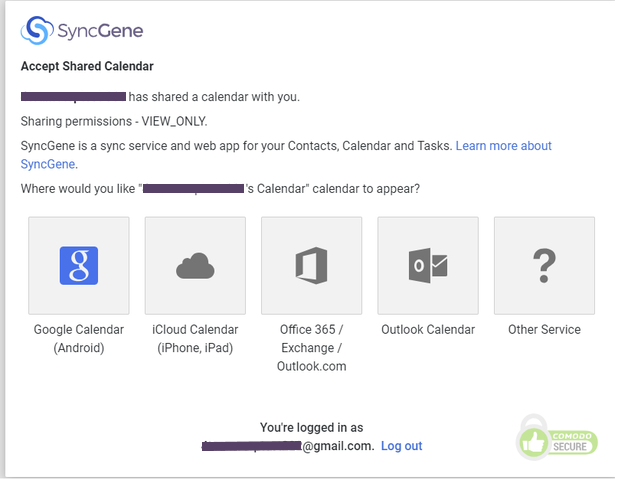
And you’re finished!
It’s really that easy to share Calendars with anyone cross-platform automatically, and in a few minutes!
Final thoughts
Now you know that using a Calendar is a fantastic way to improve productivity in both your personal and work life.
Try SyncGene’s Calendar sharing solution with your team and work more efficiently as a unit.
While you’re at it, why not check other great SyncGene features for your business? Visit our website or, if you have any questions, contact our customer support via Live Chat.
Read more:


%20white.svg)
.svg)