Merge multiple Google accounts
There may be times when you need to create a new Google account. Whether for business, school, or because your old email ID is confusing and hard to spell. Or maybe you don’t want to be known as casanova@gmail.com anymore. The main issue with creating a new Google account is that your most used data, like Contacts or Calendar, is not transferred automatically from one account to another. Luckily, we know a few ways to get the job done efficiently.
There may be times when you need to create a new Google account. Whether for business, school, or because your old email ID is confusing and hard to spell. Or maybe you don’t want to be known as casanova@gmail.com anymore.
The main issue with creating a new Google account is that your most used data, like Contacts or Calendar, is not transferred automatically from one account to another.
Luckily, we know a few ways to get the job done efficiently.
Table of Contents:
Link two Google accounts: considerations and limitations
The fact is: there is no fully automated way to merge two Google accounts into one. You will have to carry out this process manually.
What do we mean by manually?
We are talking about exporting files from one Google account and importing it to another for each Google product you use, like:
- Calendar
- Contacts
- Documents
- Photos
Considering your Gmail inbox, the transfer process is hardly easy. You will want to use Internet Message Access Protocol (IMAP) to transfer both old and new emails to a new Gmail account. Or you can set email forwarding rules, but they will only apply to newly received emails.
For Contacts and Calendars, the process is different. You will not need to use IMAP to transfer address lists and events from one Google account to another. Just have a good strategy for data transfer.
In this article, we will present you step-by-step instructions on how to transfer Contacts and Calendars manually. And later, we will talk about the tools that you can use to automate the workflow.
All for you to avoid the hassle of a complex data transfer.
So, let’s start merging your Google accounts into one by getting your Calendar events and Contacts in one place.
Merge Google Calendars manually
To merge events from one Google account to the other, you will need to export data from the old Calendar and import it to the new one.
If you want to do this process automatically, go straight to “Merge Google Calendars automatically”. Otherwise, follow the steps below.
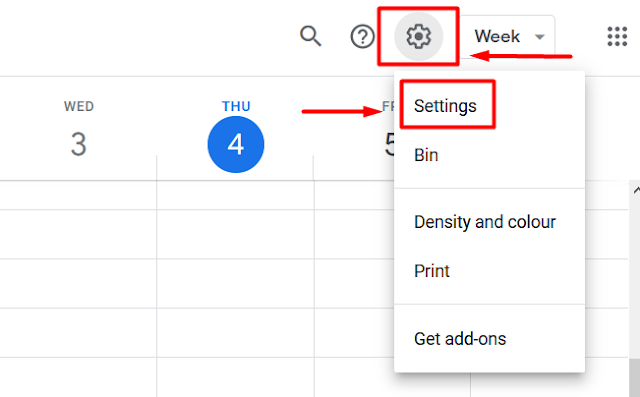
Step #1. Go to Google Calendar and log into the account from which you want to export the events. Then, click on the gear icon and choose “Settings”.
Step #2. Click on the “Import & Export” button on the left panel and choose “Export” below your Calendar folders.
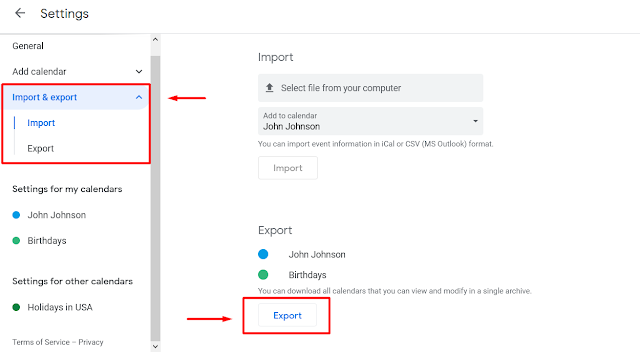
Step #3. Save the ical.zip file to your computer – you will need it later.
Step #4. Now, you will need to log out of one Google account and log back in to the new one, in which the Calendar will appear.
Step #5. Once you are ready, go back to settings and click “Import & Export”. This time you will select the “Import” tab and click on “Select file from your computer”.

Step #6. Select the .ics file you just downloaded from your old Google account.
You are all set! All your existing appointments and events will appear on the new Google Calendar.
Keep in mind that if any new meetings appear on your old Google account, they will not appear on your new account. You will need to create each new event in your new Google Calendar manually. Or you can always repeat the above steps.
We have a better solution for you! Set up synchronization between two Google accounts and move Calendar events from one account to another automatically.
Scroll down to “Merge Google Calendars automatically” to see how to do it.
Merge Google Contacts manually
Now that you are all set with your Google Calendars, let’s move your Contacts as well. In case you want to go straight to the automated process, scroll down to “Merge Google Contacts automatically”.
Here's how to transfer Contacts from one Gmail account to another manually.
Step #1. Log in to Google Contacts with your old Google account. Then, click the “Export” button on the left panel.
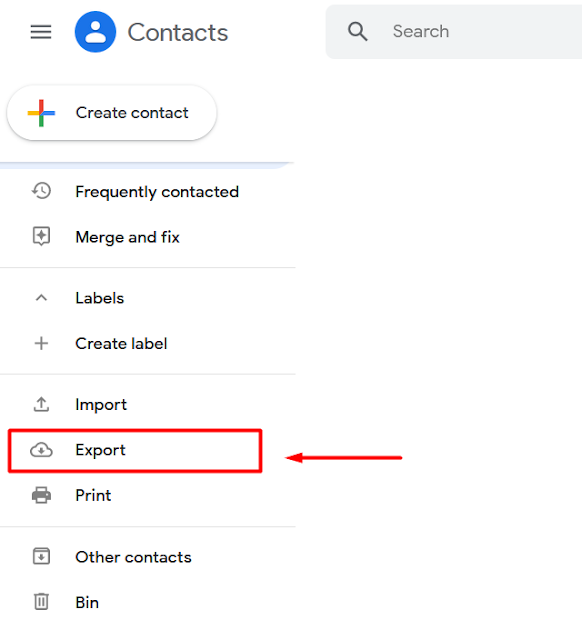
Step #2. In the drop-down menu, select which Contacts you want to bring to your new Google account. Or select “All contacts” to get everyone. Then, choose the file format (e.g., Google CSV) and click “Export”.
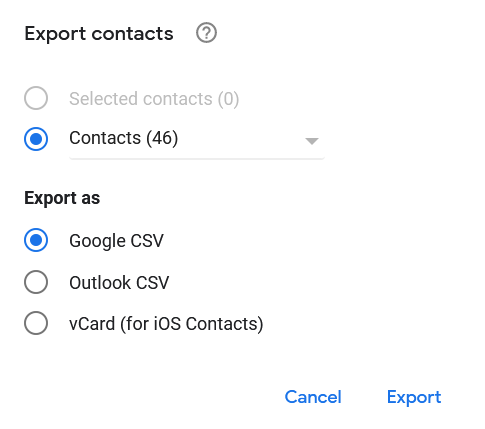
Step #3. Save the .csv file to your computer – you will need it later.
Step #4. Now, you will need to log out of one Google account and log back with the new one, in which the Contacts will appear.
Step #5. Import the Contacts list by clicking on “Import” and then selecting the CSV file that you have just downloaded.
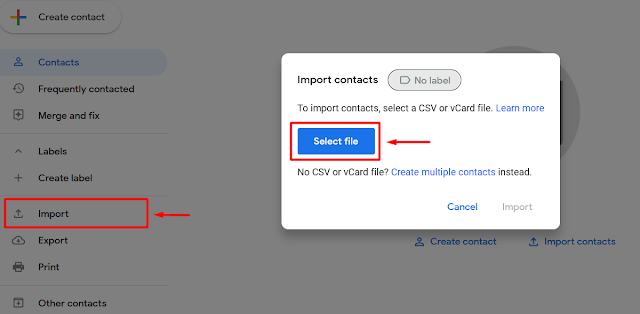
Now, all contacts from your old account have been imported to your new account.
Note that your two Google accounts are not kept in sync while transferring data manually. That means that if you enter any new contact into your old Google, it will not appear in the new account.
If you want to automate data transfer and set up synchronization between your two Google accounts, go straight to the “Merge Google Contacts automatically” section.
Link two Google accounts with SyncGene
As you can see, there is no one straightforward way to get all your data from one Google account and transfer it to another automatically. But when it comes to Calendars and Contacts, SyncGene can help you save lots of time and effort.
No matter if you are looking for an automated way to:
- transfer Calendars and Contacts from one Google account to another one time
- use two Google accounts in parallel and sync data between them
SyncGene will have you covered either way!
And here’s how.
Merge Google Calendars automatically with SyncGene
Use SyncGene’s web app to transfer Calendars between your Google account automatically and hassle-free. And without any CSV files.
Simply follow the below steps.
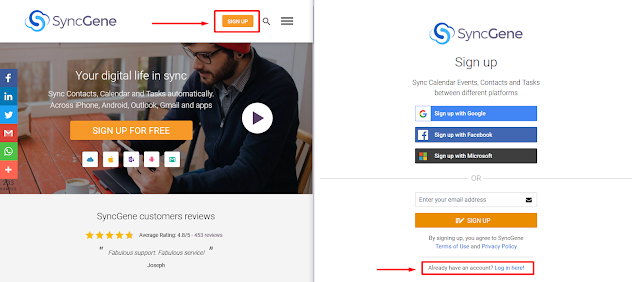
Step #1. Create a SyncGene account. Head to the SyncGene website, or if you're on the go, use the app on your iPhone or Android phone.
Click “Sign up” to get a SyncGene account. Sign up with Facebook, Google, Microsoft, or enter your email address. Use these credentials to log into your account next time.
Step #2. Add your Google account. When on the main dashboard, click “Add Source” and choose “Google” to log into your Google account.
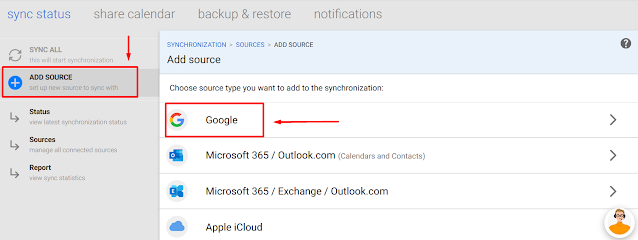
A notification will come up as soon you will add a new source.

Step #3. Add another Google source the same way.
Step #4. Once your Google accounts are set up, choose folders that you want to synchronize. Click “Sources” on the left panel and choose “What to sync”.
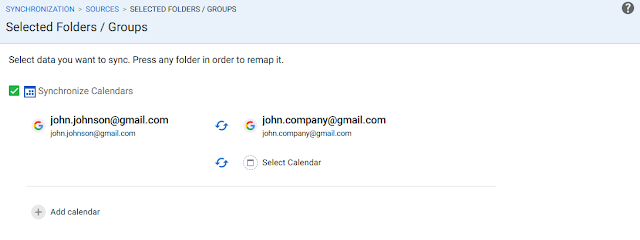
Select which folders from the old Google Calendar you want to synchronize with your new account. Choose between existing folders or create new ones.
Click “Save” once you are ready.
Step #5. Choose synchronization directions. Click “Sources” again and then see “Directions”.

Here you will specify in which direction your Calendars will be updated. Choose between:
- One-way synchronization.
- Two-way synchronization.
- Free-busy only to one of your Google accounts.
When the “Free-busy” direction is enabled, the receiving Google account will see calendar availability only. In this case, the service will not synchronize the name of the event, participants, location, and other details.
Click "Save" to process your workflow.
Step #6. Synchronize and automate. Premium and Enterprise users can enable auto-sync anytime. Press on “Status” and turn “Auto Sync” on. If enabled, your data will be synchronized every 30 minutes. Alternatively, synchronization can be started at any time on the main dashboard.

Success! From now on, whenever there is a new entry made in one of your Google Calendars, it will appear on all connected devices. Including your brand-new Google account!
Merge Google Contacts automatically with SyncGene
When it comes to transferring Google Contacts from one account to another, the workflow is the same as with Calendars. You can do everything automatically and without any CSV files.
Let’s go through the steps on how to transfer Contacts from one Google account to another with SyncGene.
Step #1. Log into your SyncGene account via the web or the mobile app.
Step #2. Add your Google account by clicking on “Add Source” and choosing “Google”. Enter your credentials.

Step #3. Add another Google account the same way.
Step #4. Once your Google accounts are set up, choose the folders that you want to synchronize. Click “Sources” on the left panel and choose “What to sync”.

Set up which Contact folders will be linked to their equivalent folders across your accounts. For example, you can link a Contact folder from your old Google account named “Coworkers” to the default Contacts folder in your new Google account.
Do not forget to save your settings when you’re done.
Step #5. Choose synchronization directions. Click “Sources” and then choose “Directions”.
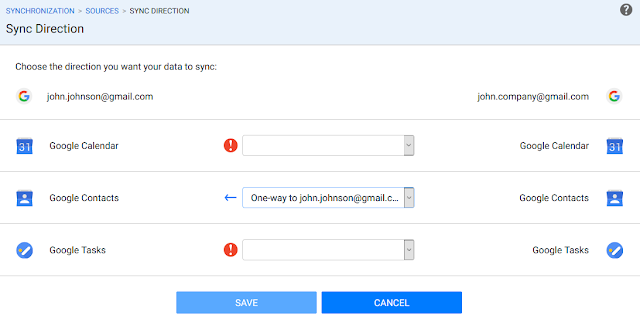
For contacts, you can choose between:
- One-way synchronization.
- Two-way synchronization.
When you enable two-way synchronization, any changes on one Contact list will be reflected on all connected sources. Choose one-way synchronization if you want to synchronize contacts in one direction only.
Click "Save" to process your workflow and “Sync All” to start the synchronization.
Summing up
You’re all good to go! All Contacts and Calendar are in your new Google account. You will even start seeing new meeting entries and new contacts from your old account automatically.
See how easy it is to move data with SyncGene? And think of all the time that you will save.
What are you waiting for? Check SyncGene solutions now!
If you have any questions, send us an email, give us a call, or start a Live Chat and we will be happy to help.
Read more:


%20white.svg)
.svg)