

How to Merge Office 365 Accounts
Most people use a single Office account to log into all of their devices. But what if you have multiple accounts, or you want to switch over to a new one? Truth be told, if you ever need to merge two Office accounts, it can be a pain. Not to worry! In this article, we’ll show you how to merge two Office 365 accounts into one manually, with the help of Outlook, or automatically using SyncGene.


Most people use a single Office account to log into all of their devices. But what if you have multiple accounts, or you want to switch over to a new one?
Truth be told, if you ever need to merge two Office accounts, it can be a pain.
Not to worry! In this article, we’ll show you how to merge two Office 365 accounts into one manually, with the help of Outlook, or automatically using SyncGene.
Table of Contents:
Can you combine two Office accounts?
Office 365 has become a leading platform, driving productivity at home and in the workplace. Whether it’s managing emails in Outlook, or building analysis spreadsheets in Excel, Microsoft has made carrying out many computer-based tasks easier for all of us.
In theory, users need only one Office 365 account to link all the apps and services provided by Microsoft. Despite this, there are times when people end up having several different Office accounts – for personal needs, work, or school.
If you are reading this article, you already know that Microsoft does not allow merging two different Office 365 accounts into one. Not automatically, that is.
That being said, there are several workarounds to combine two Office 365 accounts:
- Merging PST files manually
- Adding an alias to an Office account
- Adding an email account to Outlook
- Merging Calendars and Contacts automatically
Next, we’ll explain the differences between these options, giving you explicit instructions on how to work with each of these alternative solutions.
Merging PST files manually
One way to merge different Office accounts into one is to combine different PST (or Personal Storage Table) files.
Combining PST files in Outlook is a relatively quick task that works with all Outlook versions from 2007 up to the current time.
Merging PST files manually is a two-stage process.
Stage 1. Export emails, contacts, and calendar items from Outlook to a .pst file
1. Open the Outlook application on your computer and sign in.
2. At the top of your Outlook ribbon, choose File.

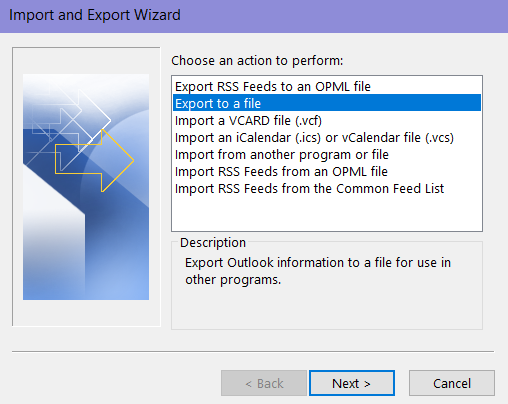
3. Choose Open & Export, then Import/Export. This starts the Import/Export wizard.

4. Choose Export to a file.
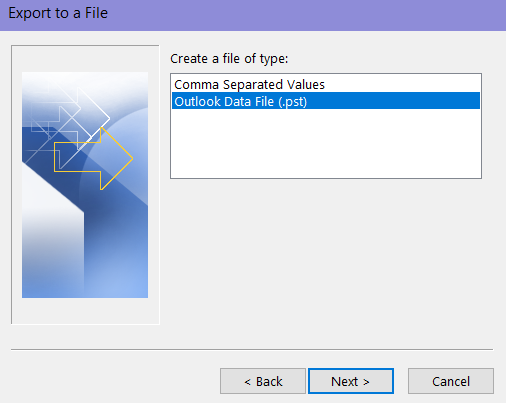
5. Click Outlook Data File (.pst), then Next.
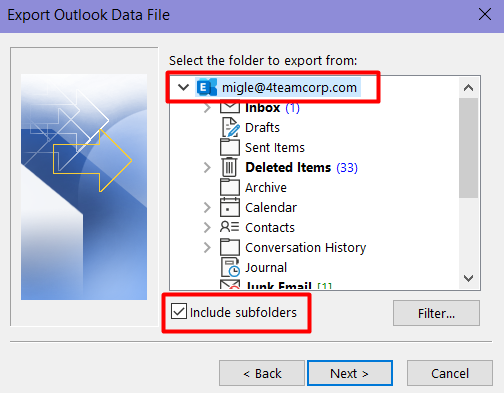
6. Select the email account you want to export. Make sure that the Include subfolders check box is marked. This ensures that everything in the account will be exported: Calendars, Contacts, and Inbox items. Choose Next.
7. Click Browse to select where to save the Outlook Data File (.pst). Enter a file name and click OK to continue. Choose Finish.
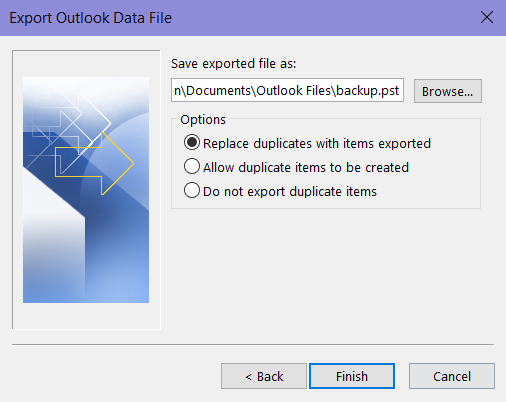
All your Outlook data will now be saved locally in a portable .pst file.
Stage 2. Import your emails, contacts and calendar to Outlook
1. Open the Outlook application on your computer and sign in.
2. At the top of your Outlook ribbon, select File.
3. Select Open & Export, then Import/Export.
4. Select Import from another program or file, and then click Next.
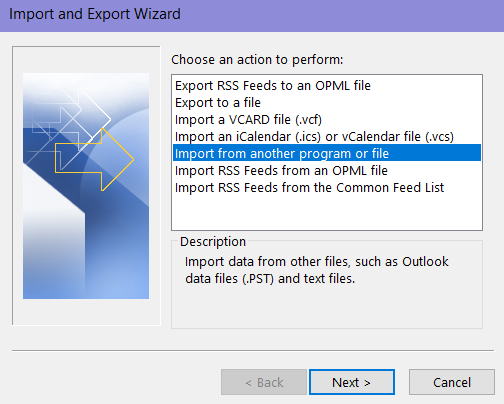
5. Select Outlook Data File (.pst) and click Next.
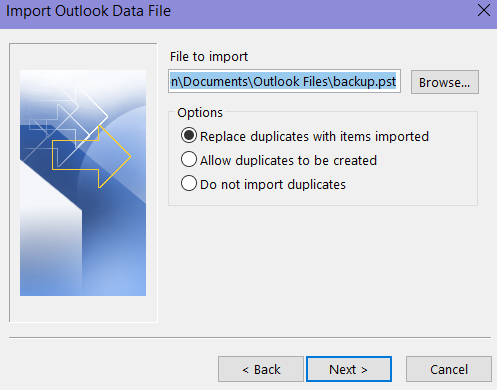
6. Browse to the .pst file you have previously downloaded. Under Options, choose how you want to deal with duplicated data, then choose Next.
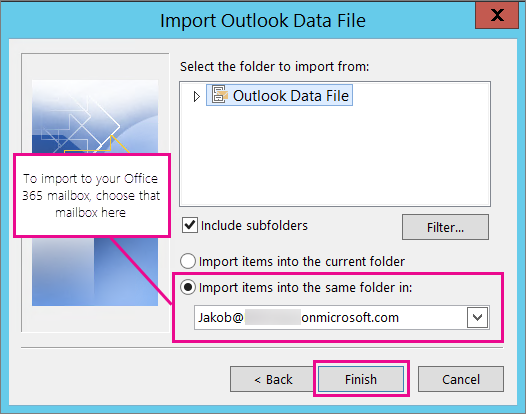
7. If you’re importing the contents of your .pst file into a certain Office 365 mailbox, choose that mailbox in the next pop-up window.
If you’re NOT importing into your Office 365 mailbox, choose Import items into the current folder. This imports the data into the folder currently selected.
8. Choose Finish.
Outlook will start importing the contents of your .pst file immediately. When the progress box disappears, the import is finished.
As easy as it seems, merging PST files can become a complex task, as it requires your full attention. Missing one minor detail could result in data loss or file damage.
Additionally, you will need to repeat this process after new events or contacts are added to one of the accounts.
To save precious time and effort on repetitive tasks, use SyncGene to set up synchronization between two Office accounts. Scroll down to “Merge Office 365 accounts automatically with SyncGene” to see how to do it.
Add an email alias in Outlook
Another way to see data from two Office 365 accounts would be to add one of your Office accounts as an alias in Outlook.
An alias is an additional email address that you can add to your Outlook account. After this, users can see the same inbox, contact list, and account settings as the primary email address.
This solution will not merge data from different accounts as such – it will only compose a single view for several different accounts.
Before adding the alias to an Office account, be aware of a few pre-requisites:
- You can’t add an email address that’s associated with a work or school account as an alias.
- Existing Hotmail, Live, Outlook.com, and MSN addresses can’t be added as aliases.
- You can’t add an alias that is already associated with another Microsoft account.
If you are ready to go, here’s how to add an alias to your Outlook account.
1. Go to Add an alias on Outlook.com. Sign in to your account. Use the primary account to login, so that you can add the other account as an alias.
2. Under Add an alias, choose Add an existing email address as an alias.
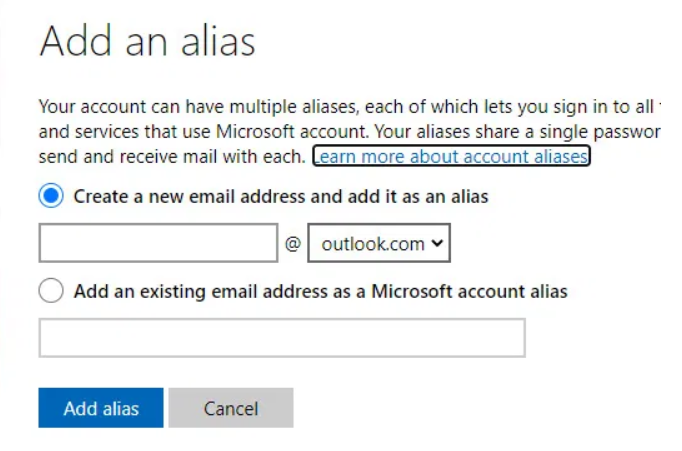
3. Select Add alias.
Now, you can manage both the alias and the primary account under one view.
You can add up to 10 different aliases, by creating new ones or adding existing accounts.
Add an email account to Outlook
Another way to see data from two Office 365 accounts would be to add an email account to your Outlook application on a computer or mobile device.
When attaching another email to your Outlook account, you can easily switch between several inboxes and access features through them. This means you can send emails, check your incoming mail, and even delete emails within Outlook.
One of the downsides to using connected accounts in Outlook is the sync limitations. When making changes or sending emails, the syncing is one-way only, meaning that changes won’t show up outside of Outlook.
Additionally, the setup will be visible on a single device only. For example, if you add an account to your mobile Outlook application, it won’t be visible on your desktop app.
If you have decided to go with it, here’s how to connect another email to your Outlook account.
1. Open the Outlook application on your computer or mobile and sign in.
2. Then, select File > Add Account
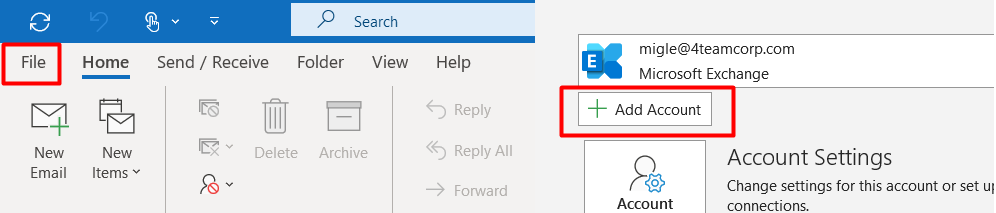
3. Enter the email that you want to add and click Connect.
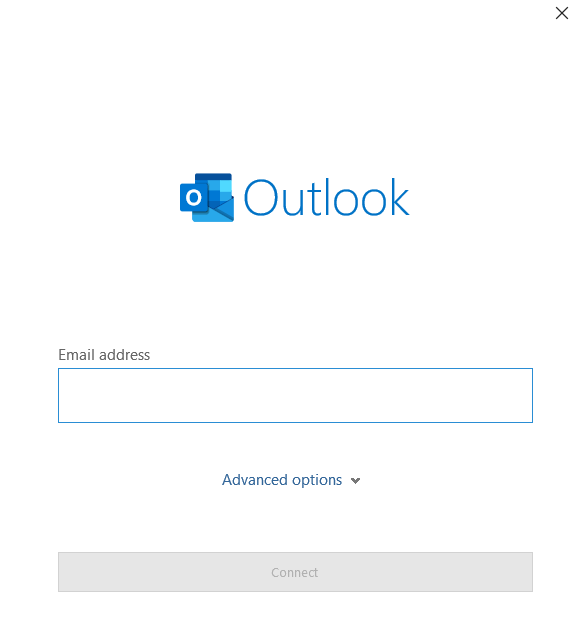
4. Enter your password again, then select OK and Finish to start using your email account in the Outlook application.
That’s it! Now you know all the workarounds you can take to connect several Office 365 accounts manually or using the Outlook applications.
Next, we will show you how to automate the process with SyncGene in a matter of minutes.
Sync data with SyncGene

As you can see, there is no one straightforward and limitation-free way to get all your data from one Office account and transfer it to another automatically.
But when it comes to Calendars and Contacts, SyncGene can help you save lots of time and effort.
No matter if you are looking for an automated way to:
1. transfer Calendars and Contacts from one Office 365 account to another
2. use two Office accounts in parallel and sync data between them
SyncGene will have you covered either way!
Merge Office 365 accounts automatically with SyncGene
Use SyncGene’s web app to transfer Calendars and Contacts between your Office account automatically and hassle-free. And without any PST files.
Simply follow the below steps.
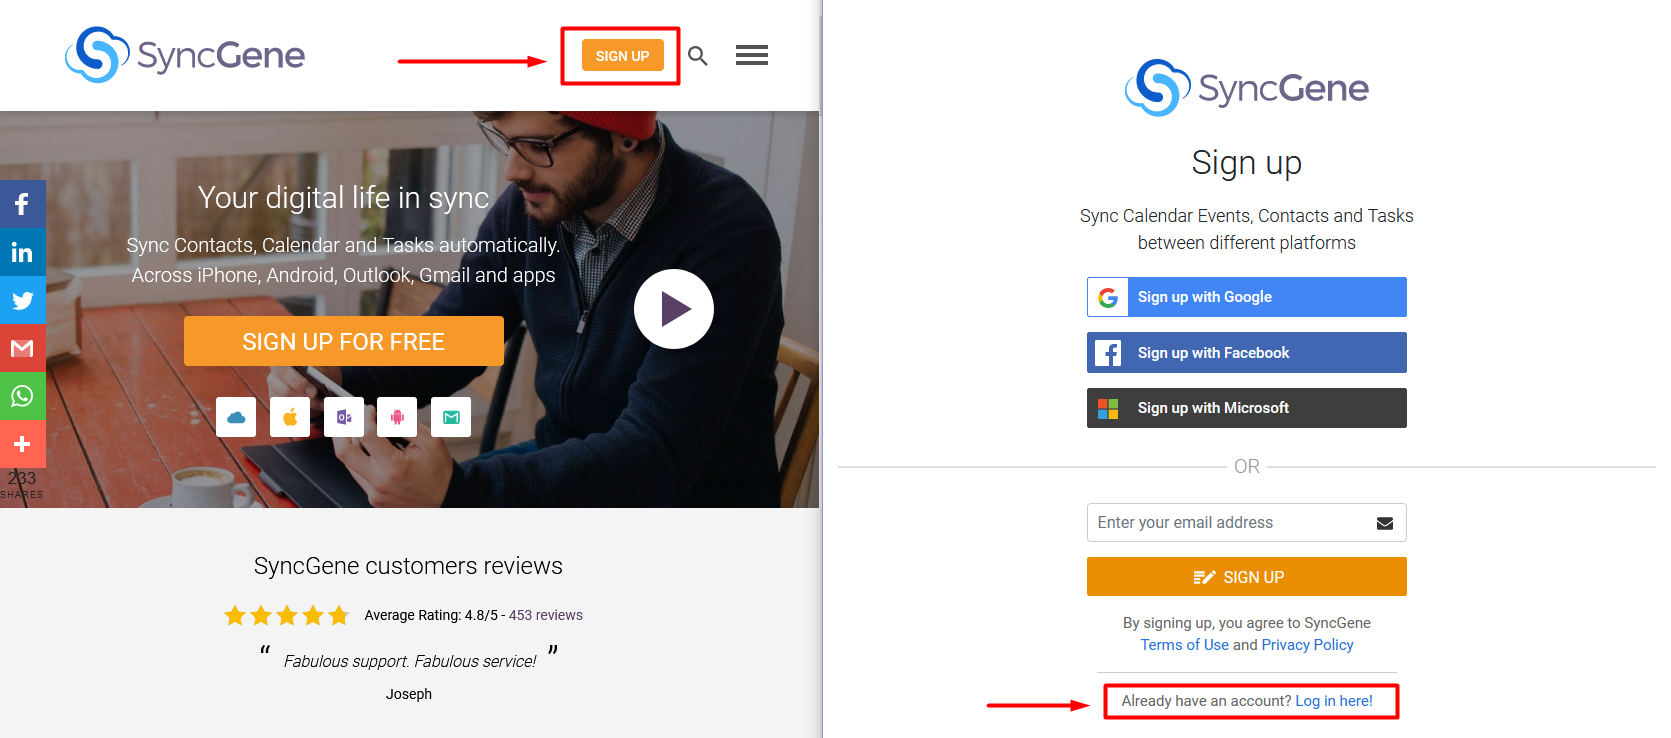
Step #1. Create a SyncGene account. Head to the SyncGene website, or if you're on the go, use the app on your iPhone or Android phone.
Click “Sign up” to get a SyncGene account. Sign up with Facebook, Google, Microsoft, or enter your email address. Use these credentials to log into your account next time.
Step #2. Add your first Office 365 account. When on the main dashboard, click “Add Source” and choose “Microsoft 365 / Outlook.com” to log into your account.
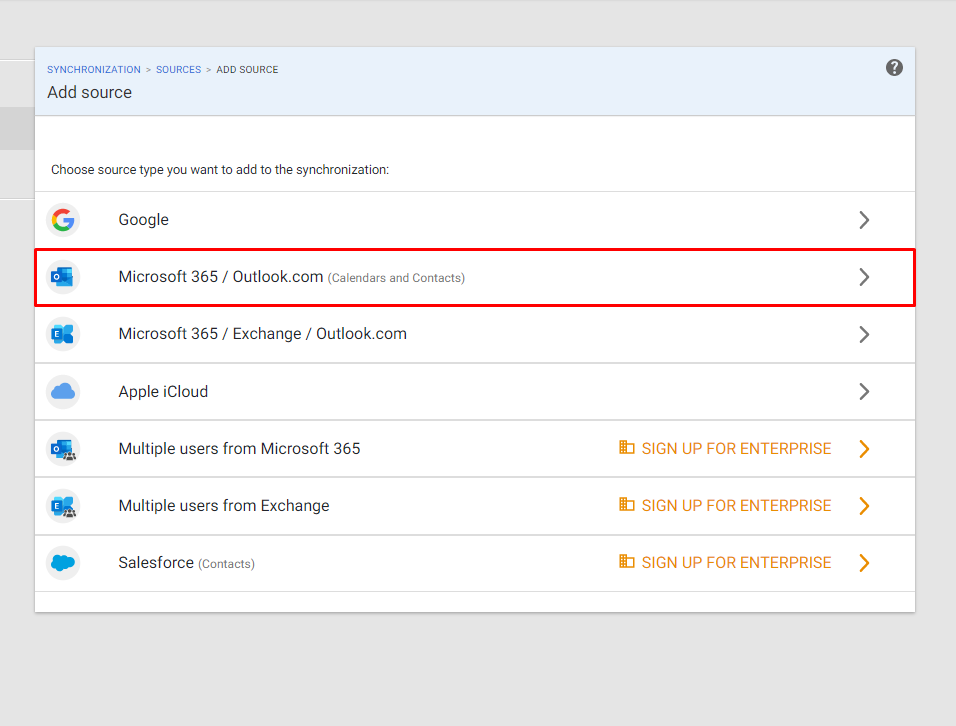
A notification will come up as soon as you add a new source.
Step #3. Add another Office 365 account in the same way.
Step #4. Once your Office accounts are set up, choose folders that you want to synchronize. Click “Sources” on the left panel and choose “What to sync”.

Select which Calendar and Contacts folders you want to synchronize. Choose between existing folders or create new ones.
Click “Save” once you are ready.
Step #5. Choose synchronization directions. Click “Sources” again and then see “Directions”.
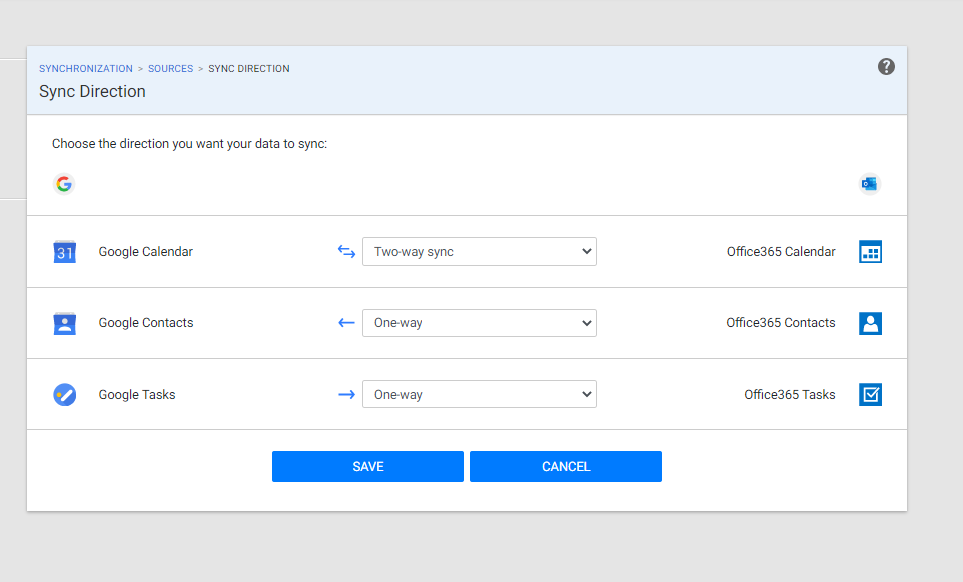
Here you can specify in which direction your Calendars will be updated. Choose between:
- One-way synchronization.
- Two-way synchronization.
- Free-busy only to one of your Google accounts.
Step #6. Click “Save” to process your workflow.
Success! From now on, whenever there is a new entry made in one of your Office Calendars and Contacts, it will appear on all connected devices.
Summing up
You’re all good to go! Just choose the way you are most comfortable with and have all Contacts and Calendars in your new Office 365 account.
Don’t forget to check out SyncGene to move data easily and automatically. Think of all the time that you will save!
If you have any questions, send us an email, give us a call, or start a Live Chat and we will be happy to help.
Read more:


%20white.svg)
.svg)