7 Outlook Tips You Need to Be More Productive
As simple as Outlook seems, it is actually a powerful emailing tool and is highly customizable for our convenience. It has many features that can automate our daily tasks and make our days more productive.
Outlook is the industry standard for business emailing and calendar planning.
It is very likely that you, just like most corporate world people, use it for work. You start your days with it, you end your days with it and you cannot imagine a single day without it. If you notice yourself nodding to the latter sentence, you will find this article useful.
In this blog post, we will present you with some of our favorite tricks to make your Outlook experience smoother and workday more productive. Here are the best 7 Outlook tips from our team to yours.
Table of Contents:
1. Color Coding (Emails & Calendar)
If your day starts with a huge pile of new emails and you get overwhelmed by not knowing where to start, this one is for you. One of the best ways to stay on track and differentiate the most important emails and calendar events is by using colors. You can color code both emails and meetings on your calendar to make sure you do not miss what is most important.
For example, you can distinguish emails from your manager or meetings that are held outside of your office by using a distinct color. Or vice versa – you can color code emails, like when you are only in the CC line. This way, you can see that those emails are not addressed directly to you without even opening them. This way, in a long tail of emails or calendar events, you can see the most significant ones from afar and the ones that do not require immediate action.
To set colors on specific emails:
- Go to the “View” tab and click “Current View”
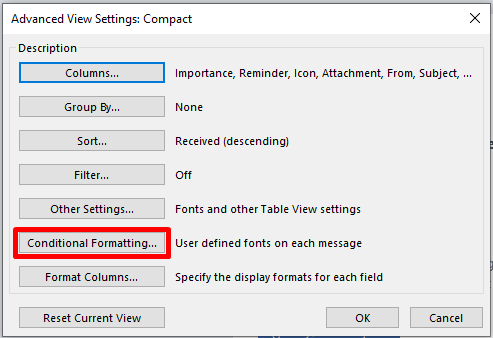
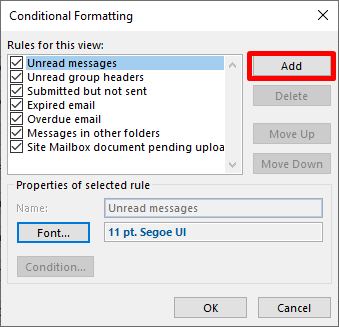
- Click on “View Settings”, then on “Conditional Formatting”
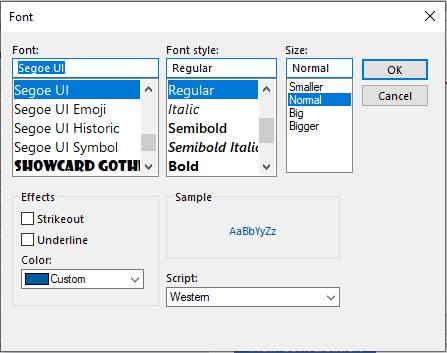
- Set your preferred font color and then click “Condition”.
- Determine a condition that best matches your needs and click OK to set it
2. Email your Calendar
We have all encountered the annoying back and forth thread of emails where we are trying to agree on a time for a meeting. How much easier would it be if the person you are trying to arrange a meeting with saw your calendar? Outlook has a built-in feature to share your calendar with anyone – inside or outside of your organization. Simply set the date range you want to share, send it to the person in question and let them do the job of picking the time, while you focus on truly valuable tasks.
To send your calendar:
- Create a new email and click “Insert”
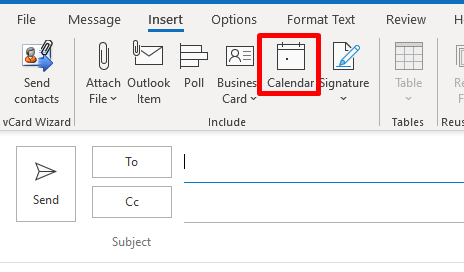
- Pick “Calendar” and set the time range that you want to share
- Pick the amount of details you want to share (it can either show your calendar slots as “Busy” or “Free”, or it can share your calendar with full details)
- Do not forget to check “Show time within my working hours only” if you do not want to be disturbed during your time off
3. Schedule shorter meetings

If you are tired and overwhelmed by back-to-back meetings and you do not even have a minute to prepare for the next one, this tip will be a life saver. Outlook has a setting that allows you to determine the default duration of your meetings. With some Outlook rules set in place, you will be able to shorten your meetings by 5 or 10 minutes, which will give you some time to have a glass of water, fresh air or just a moment to prepare for the next meeting.
To set up shorter meetings:
- Click “File” at the top of your Outlook menu
- In the bottom left, pick “Options”
- Select “Calendar” and in Calendar options you will find a line “Shorten appointments and meetings:”. Tick the box and set your preferred rules for the meetings
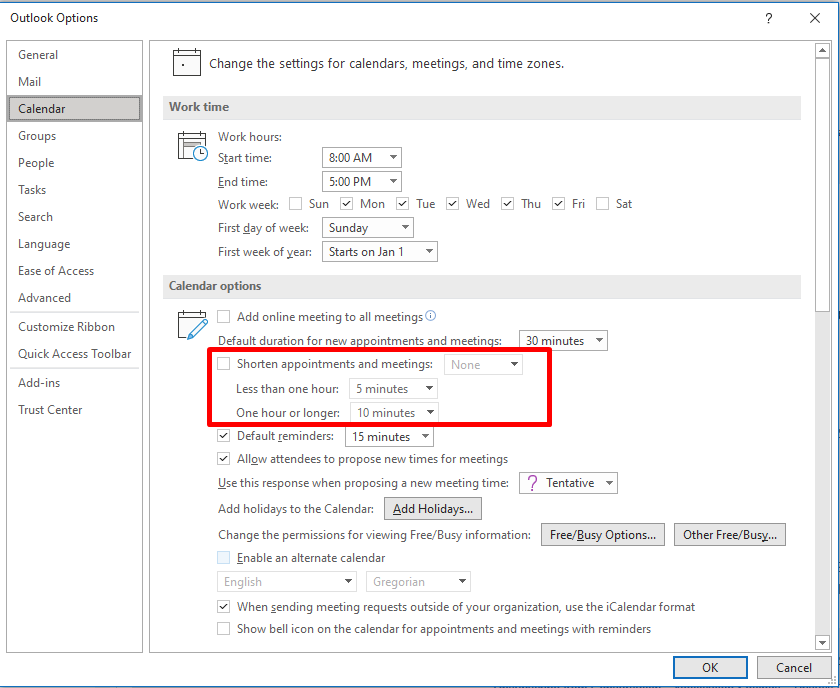
- When everything is set, Outlook will now propose shorter meeting times whenever you are arranging them
4. Automatic Replies to important emails (Quick Steps)
In business, everyone's time is money. When someone of great significance to your organization emails you, it is essential to respect their time and respond in a timely manner. But if you find yourself so busy that you cannot find time to respond to those urgent and important emails quickly, this feature will change your game forever.
Outlook allows you to set rules to respond to the most important emails with one click. By setting a rule, you can mark an email as important, and this will automatically trigger a response email to the sender. It can be an acknowledgement of a received email and a promise to respond shortly (when you finally find a minute to do so).
To set up Automatic Email Replies:
- On the “Quick Steps” menu at the top of the Outlook application, click “Create New”

- Give your Quick Step a name and open the dropdown menu of “Actions”
- Choose “Set Importance”

- Add another action from the dropdown menu - “Reply”; then click on “Show options”
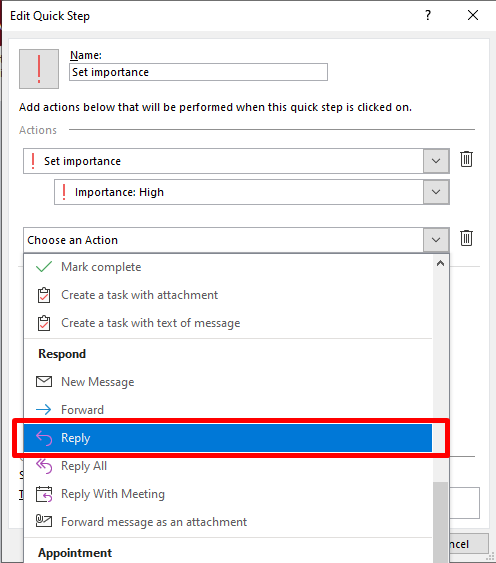
- Fill in the email text and you are set to go!
5. Rules
If you like your inbox neat and organized but keeping it clean takes you a lot longer than you would like, Rules can help you bring a bit of automation into your Outlook account and save some time in your day. You can filter out the spam mail that you keep getting into your inbox or you can set other specific senders to go into separate Outlook folders (let’s say your boss's emails). No more email sorting by hand!
To set up Rules:
- Create a new folder where you will want your specific emails to go (right click on “Folders” and pick “Create New Folder”)
- Then go to the specific email that you would like to apply the rule to and right click on it. Pick “Rules” and then “Create Rule”
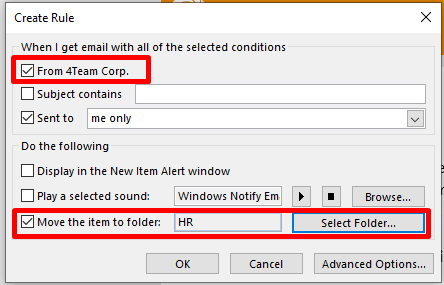
- Select the preferred settings (you can set so any email from a specific sender goes to a specific folder)
6. Offline mode
We all have experienced how a single distraction can get us out of focus. In fact, distractions do not mess up our attention for a few seconds only – it can make us forget what we were focused on and take us quite some time to get back into working mode. This wastes a lot of time, so people are looking for various techniques to eliminate distractions as much as possible.
One of the best ways is to switch to offline mode on Outlook. This will prevent you from getting emails for a set period of time and give you some time to focus.
To switch to offline mode:
- Go to “Send/Receive” section at the top menu of your Outlook app
- Click “Work Offline”

7. Sync Outlook with Gmail, Android, or iPhone

Do you sometimes get frustrated over not having access to your work email when you are away from the office? Having an option to see work meetings and contacts on your personal devices makes it convenient for emergencies or just provides access whenever you need to take a quick look at your work schedule.
Syncgene offers the option to have everything accessible in one place. It is an online subscription-based service that is especially effective for those who use several email addresses, platforms, or devices (work and personal, or simply different emails for different clients).
How to synchronize your Outlook 365 with other platforms:
- Go to SyncGene and Sign Up. Or, if you already have an account, Log In
- Click on “Add Source” to choose sources for synchronization
- Log into your Google, Microsoft Exchange, or iCloud account. Once signed in successfully, you will be re-directed to the “Manage sources” tab
- Click “Add Source” again to set up the second source
- See the “What to sync” tab to check the folders and groups you want to sync
- See the “Directions” tab to choose one-way, two-way, or “Free-busy” synchronization
- Set up your preferences and click “Save”, then “Sync All”
Now that you have set up your Outlook account for success, you can observe how your productivity increases. Experiment with the rules, quick steps and other settings and see how your Outlook will become even more convenient. With SyncGene, you can ensure that your calendar and contacts will stay synced across platforms to save even more time.


%20white.svg)
.svg)